Setting up power in Windows to run your computer on mains power and battery power! No windows 10 power supply diagram.
I noticed that most beginners who are not very good at computers when working on a laptop do not pay attention to the power settings in Windows (this applies to Windows 7, Windows 8, Windows 10 systems today). Windows operating systems, starting with Windows 7, have a large number of power settings to configure optimal laptop operation on battery and mains power. What is the difference? It is logical that the laptop should run on battery power for as long as possible, and to achieve this, you need to correctly configure the appropriate power supply mode, reducing the computer’s performance, for example. When working from the mains, accordingly, there is no need to save battery power and therefore the laptop requires maximum performance and maximum comfort when working!
In today's article, I will tell you about power settings in the Windows operating system, so that every beginner can optimally configure their laptop if it is running on battery power or mains power!
Users often do not pay attention to what power settings they are using in Windows due to the fact that it is not displayed in any way on the screen, i.e. There are no notifications about this. And in order to see the mode, you need to go to the appropriate settings yourself. Moreover, as a standard, these power settings in Windows may not always be optimal.
For example, you bought a brand new laptop with the Windows operating system and are already trying it out. It happens that the power settings in Windows when running on mains power are not set to maximum performance and as a result, your laptop in this power settings mode may not work at full capacity and you may not even notice it! And sometimes, by mistake, you will have the default Windows power settings mode selected with low performance (designed for running the laptop on battery power) and when you connect the laptop to a power outlet, it will not change the power mode, as a result of which it will again work at low performance.
By default, Windows always has 3 modes (plans) for setting up the computer's power supply:
- Balanced. A mid-range power plan tuned to balance performance with battery conservation. Simply put, when choosing this mode, your computer should run at medium power.
- High performance. This mode of Windows power settings is designed to run the computer from the mains (from a wall outlet) at full power, since there is no need to conserve battery power.
Energy Saving. This Windows power settings mode is designed to operate the computer on battery power, i.e. to preserve the battery charge for as long as possible and, therefore, to keep the computer running as long as possible.
Also, depending on the additional programs preinstalled on the new computer, there may be additional modes for setting up Windows power supply, for example:
- Power4Gear High Performance;
- Power4Gear Battery Saving.
Such Windows power settings exist, for example, in my Windows and they were created using the Power4Gear Hybrid program preinstalled on the laptop, designed to quickly set up power settings and automatically switch them when the laptop is running on battery power and from the network.
The two Windows power settings above are no different in their settings from the previously mentioned “Energy Saving” and “High Performance” modes. There is only one difference - the power settings modes, created using a special program, allow you to automatically turn on at the right moment, when the laptop switches to battery power or mains power. Therefore, if it is particularly unnecessary, you can completely remove the pre-installed application for switching power modes and use the standard 3 Windows power settings modes.
Each laptop can have its own additional program installed to change Windows power settings, similar to the one discussed above. It depends on the computer manufacturer. For example, Asus computers have one program installed, Acer computers may have another program.
Please note that the power settings modes are only needed if you have a laptop, since these are the types of computers that are equipped with a battery and have the ability to work from it, without being connected to an outlet.
If you have a stationary home computer, then there is no point in switching Windows power settings, because such a computer always runs on mains power, which means it should always work at maximum performance!
Let's look at how to switch power settings modes in Windows 7,8,10 and configure them.
How to switch computer power settings in Windows 7/8/10?
In order to quickly switch to power settings modes, you will always see a battery icon in the Windows tray.
To go to the power supply settings modes, right-click (right mouse button) on this icon and select “Power Options”:
The window at the top will always display the “Balanced” scheme and the one you used last time:
In order to open all available power supply configuration schemes, click LMB (left mouse button) on the subsection “Show additional schemes”:
As a result, all Windows power settings will be displayed:
The power supply setting mode that is currently enabled is marked with a circle:
Therefore, in order to switch the Windows power settings mode, you just need to LMB on the circle opposite the desired mode. The desired mode will be activated immediately.
The standard Windows power settings scheme, which allows the computer to run on battery power and allows you to retain the battery charge for as long as possible, is called “Energy Saver”. Therefore, you only need to enable this mode when you unplug your computer and it starts running on battery power. Or, in this case, you can use the “Balanced” power supply settings mode, then performance will not drop much and the battery charge will be discharged at an average rate.
If the computer is running from a wall outlet, then it is better to turn on the “High Performance” mode so that the computer works at full capacity.
However, for convenience, in order not to constantly switch Windows power settings modes, you can simply use one mode, which you configure for two cases at once - for running the computer on battery power and for running the computer on mains power. Each of the previously presented standard power modes contains settings for operating the computer on battery power and on mains power.
But in order not to mess with the standard settings, you can simply create your own power supply mode.
Now let’s figure out how to optimally configure the computer’s operating mode on battery and mains power.
Settings for computer operation on battery and mains power!
For convenience, in order not to constantly switch between Windows power settings modes depending on whether the computer is running on battery power or on mains power, I recommend creating your own power supply mode and configuring it to operate the computer both on battery and on power outlet.
To create your own settings mode, in the “Power Options” window on the left, click the “Create power management scheme” button:
In the window, first of all, you need to select one of the standard Windows power settings schemes, on the basis of which your personal scheme will be created (1). This is not important, since I will discuss all the power supply settings below in this article. Select, for example, the "Energy Saving" scheme. Next, below you need to indicate the name of your scheme (2). Just think of anything. And then click the “Next” button (3).
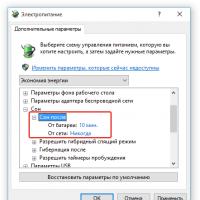
A window will open where the standard Windows power settings will be displayed, namely: after how many minutes to turn off the screen, after how many minutes to put the computer into sleep mode and setting the screen brightness.
Let’s immediately move on to the full list of settings for the created power supply scheme, where you can configure each parameter, including the above. To do this, click the “Change advanced power settings” button:
The settings window for the selected power supply mode will open. First of all, check that the desired Windows power settings mode is selected at the top, i.e. created by you. Then click LMB on the “Change parameters that are currently unavailable” button:
This is to unlock some settings that you probably won't be able to configure right away using your computer's administrator rights.
Now let's start setting up the power mode.
In the center of the window, a list displays several sections of the settings for the selected Windows power mode. Each section can be expanded using the “+” button and you can see all its settings.
Each setting has the option to choose between battery and mains operation. Since when the computer is running from the mains, there is no need to save battery power, you can configure the “from the mains” option to the maximum - for maximum computer performance. Thus, even if you turned on the “Energy Saver” mode, but connected the computer to a power outlet, it will work at full power. This will allow you not to switch power settings again and not get confused. Below everything will be discussed in detail and it will become clear to you.
Power settings of the created mode in order:
USB Settings. There is one power supply setting “USB Port Temporary Disablement Option”. Since devices connected to the computer via USB also affect the drain of the computer’s battery, you can configure USB devices to turn off when the computer is idle. They won’t be involved at this time anyway.
Therefore, for the “On Battery” mode, select “Allowed”, and for the “On Line” mode, you can set any value. In principle, so that USB ports do not work in vain, it is better to set the same value - “Allowed”.
Intel® Graphics Settings. This section of Windows Power Options will only appear on computers with an integrated graphics card from Intel. The option in this section will only have one “Intel® Graphics Power Plan” and allows you to configure the performance of the integrated Intel graphics card.
For the “On Battery” mode, I recommend selecting “Maximum Battery Life”, which means maximum conservation of battery charge. Thus, when the computer is running on battery power, the video card will operate at minimum power, thereby preserving the battery charge of your computer.
For the “Online” mode, select “Maximum Performance”, i.e. – maximum performance of the built-in video card.
Power buttons and cover. Use this section of Windows Power Options to configure your computer's power buttons and what happens when you close the laptop lid.
There are several options here:

PCI Express. Here you can configure power for devices connected to the PCI Express connectors of the computer. PCI Express devices can be, for example, sound cards, network cards, video cards and various other devices.
Processor power management. These are quite important Windows power settings, with which you can adjust the power of the processor, thereby increasing or decreasing the computer’s performance when running on mains and battery power, and also adjust the cooling intensity.
There are 3 settings here:

Screen. Here you can configure the screen brightness settings and the time it turns off when the computer is running on battery power or on mains power.
There are 4 Windows power settings in this section:
Turn off the screen after. Everything is simple here... To save battery power, you can configure the period of computer inactivity in minutes, after which the monitor will be turned off. To turn it on, just move the mouse or press any button on the keyboard, i.e. show that you are sitting down at the computer again.
For the “On Battery” mode, it is better to set a shorter period, for example, 2 minutes. Those. If no one touches the computer for 2 minutes, the screen will turn off and thereby save battery power.
For the “Online” mode, on the one hand, you can not set the screen to turn off at all (i.e. set the value to “0”, which means “Never”) and then your screen will always be on, even if no one is at the computer all day sit. After all, there is no need to save the battery, the computer runs on mains power. But on the other hand, a monitor is also a device that and all sorts of components in it can wear out, so I recommend that you still set the period of its shutdown in this Windows power supply setting, even when operating from the mains. 15-20 minutes is about right, in my opinion.
Screen brightness. Here we can adjust the brightness of the monitor screen when the computer is running on battery power or on mains power.
Again, the higher the screen brightness when the computer is running on battery power, the faster the battery will drain. On the other hand, some people are very uncomfortable working with a low brightness level and there is nothing to be done about it. Therefore, everyone should adjust the brightness to suit themselves.
For example, for the “On Battery” mode, I set the brightness for myself to 30%, for me this is normal and battery power is saved in one thing :) You can experiment, see what brightness will be minimal for your eyes, so that your eyes don’t get tired and you can work comfortably .
If the computer is running on mains power, there is no need to save battery power, which means the brightness can be left at maximum – 100%.
Screen brightness level in dim mode. For some computer models, in the main Windows power settings (), there is a “Dim display” item, which allows you to specify a period of computer inactivity, after which the computer screen darkens, but does not turn off completely.
It is precisely this mode that is affected by this brightness setting. For example, on my Asus N76VJ laptop the screen can only turn off itself, or I can manually adjust the brightness. But I don’t have an automatic screen dimming function, which means the power supply setting we’re currently considering is useless for me.
If your model supports screen dimming, and you have set the Windows power settings to automatically dim after some time (for example, after 5 minutes of computer inactivity, the screen dims, and after 10 minutes it turns off), then in the current setting under consideration you can specify a specific percentage of brightness in display dimming mode.
If my monitor supported this feature, then I would set exactly the same values as in the screen brightness settings (see point 2 above), for example, 30% from the battery and the same amount from the network.
Enable adaptive brightness control. Here you can enable or disable the ability to automatically change the screen brightness depending on external light sources and images on the screen. For example, if there is bright light around you, the screen brightness will decrease on its own, and if it is dark in the room, the brightness will increase. But not all monitor models support this feature.
Personally, I don't like automatic brightness control, because I can quickly change the brightness when I need it. Therefore, I have this function disabled for both the “On Battery” mode and the “On Line” mode.
Battery. This section of Windows power settings controls how your computer behaves at different battery charge levels.
There are 6 power settings in this section. For convenience, I will consider the settings not in the order they are indicated in the corresponding window, but according to their logic:
Low Battery Notification. Here we can enable or disable the warning that the battery is about to run out.
Low battery level. In this power setting, we indicate the state of charge of the battery when the low battery warning appears on your screen (see point above). The warning can be turned on or off and this is controlled by the “Low Battery Notification” setting (see point above).
If the laptop is more or less new and its battery is not yet worn out, then the standard values for this setting will be optimal. They are equal to 10%.
But if the battery is already weak (holds a charge noticeably lower than it did when purchased), then I recommend increasing the percentage to somewhere around 15%. Otherwise, it may happen that your computer will shut down even before this first warning appears due to severe battery wear. Therefore, if such a problem is observed, increase the level to 15% and, possibly, higher - experimentally.
Low Battery Action. This Windows Power Options setting lets you choose what happens to your computer when the battery level is low. The low battery level was set in the appropriate settings (see point above).
Since a low battery charge is not just the first warning and the computer can be used for a long time, I recommend not setting up any actions here. Those. set “No action required”.
Backup battery level. This is the second warning about the battery being discharged, and specifically, that the battery is about to run out completely, possibly any minute.
After receiving this warning, I strongly recommend that you save all work on your computer to avoid accidentally shutting down your computer due to a worn-out battery. It’s better to play it safe and save the results of your work after receiving the first warning (the “Low battery notification” setting).
The standard value for this setting is 7% and this is normal if your computer is new and its battery is not yet worn out.
But if the computer is no longer new, for example, mine is 2 years old and the battery is already worn out (noticeable immediately, since the computer will run on battery power much less than before), then I recommend raising the level of the backup battery to somewhere around 10-12% (you can do it yourself experiment). Otherwise, if the battery is worn out, it may turn off even at 10% charge (depending on the degree of wear) and then you will receive the first low battery warning (if you configured this warning at a 10% charge level as described in step No. 2 ) and the computer will immediately shut down, and you won’t even have time to save anything. And if the battery is very worn out, then it can turn off even at 15% charge, then you won’t even get the first warning :)
Thus, adjust the appearance of the first warning and the second depending on the degree of wear of your battery. For example, if the computer unexpectedly turns off when the battery is already low, and you have not yet received a single warning about discharge, then raise the bar for the appearance of both warnings in percentage (i.e., points No. 2 and 4).
Battery level is almost completely discharged. This is the level of battery charge at which the computer will perform the action specified in the paragraph below, i.e. “The effect of almost completely depleting the batteries.” For example, you set the almost complete discharge level to 5%, and this means that as soon as the battery charge reaches 5%, the computer will either turn off, or go into sleep mode, or into hibernation mode, i.e. depending on what you specify in the settings (see point below).
If the computer is new, then its battery is not yet worn out, and in this case the level of almost complete discharge can be left at 5% (standard value). But if the computer does not have time to perform the desired action, for example, go into sleep or hibernation mode, then the battery is completely discharged even before the charge level of 5%. This means that you need to raise the level of this setting by 3-5% and check (i.e. so that the level is 8-10%) if the problem has disappeared. Those. We adjust depending on the degree of battery wear.
Effect of almost completely discharged batteries. In this Windows power settings, we need to specify what will happen to the computer if its battery is almost completely discharged and is about to run out completely.
We are not interested in the “Online” mode and put “No action required” there. We are only interested in the “On Battery” mode and select one of the options there: sleep, shutdown the computer (shutdown) or hibernation.
In this power supply setting, I recommend setting the value to “Hibernation”, because if the battery is almost completely discharged, in sleep mode the battery may completely discharge and then the computer will turn off, and all the work that was done on it will be lost! And when the computer falls asleep in hibernation mode, all work will be restored as soon as you connect the computer to a power outlet and turn it on.
Save energy (you'll see the name of the power settings you created instead!). The only setting here is “Require password on wakeup”. This option only makes sense when your Windows user has a password set. Those. when only knowing the password can you get into Windows and work on your computer.
This Windows power setting means that you can enable or disable the password requirement to log into Windows after the computer is “awake”, i.e. after waking up from sleep mode.
Otherwise, if someone else wakes up your computer from sleep mode, he will be able to immediately use the computer, since the system will let him in without entering a password.
HDD. The only setting here is after what time the computer is inactive to turn off the hard drive. This will allow you to avoid overloading your computer’s hard drive, i.e. do not wear it out and at the same time save battery power. As soon as work on the computer continues, the hard drive will immediately continue working.
If you don’t know what a hard drive is, I recommend reading my article about the main components of a computer:
Internet Explorer. Here, too, there is only one power supply setting - “JavaScript Timer Frequency”. In general, it makes sense to configure this section only if you use the standard Windows browser “Internet Explorer” to view websites and the Internet. In other cases, this settings section will not be used at all.
What does "JavaScript Timer Frequency" mean? This means how often functions will be executed in JavaScript scripts on websites on the Internet. The higher the frequency, the smoother it will play, for example, a flash video or some other program on the site. However, a high frequency will load the processor and, therefore, drain the computer's battery faster.
For a beginner, all these scripts hardly mean anything at all, so I recommend setting the “On Battery” mode here to “Maximum Energy Saving”, and for the “On Line” mode: “Maximum Performance”.
Desktop background options. The only Windows power setting here is "Slideshow". Here we can indicate in which case you can use a slide show of your chosen photos and pictures as a desktop background, and in which case you cannot.
A slideshow in the form of changing desktop background pictures drains your computer battery faster, especially if the picture change interval is low. Therefore, when running on battery power, I recommend disabling the slideshow (set to “Paused”), and when running on electricity, enable it (set to “Available”).
Wireless adapter settings. And the only power setting here is “Power Saving Mode.”
A wireless network adapter is a Wi-Fi adapter, i.e. a device with which your computer connects to a wireless network, and you can access the Internet without any wires.
When the Wi-Fi adapter is running, the battery drains faster and through the Windows power settings in this section we can specify the Wi-Fi operating mode to optimize battery life and power.
Dream. This section is responsible for configuring the computer's transition to various low-power modes.
You can read more about the purpose of each Windows energy saving mode and their differences in a separate article:
There are several options in this section:

Media options. These Windows Power Options control video playback settings to optimize energy efficiency when your computer is running on battery power or on AC power.
There are 2 power settings:

Now you know how to configure your computer for maximum performance when running on mains power, and how to keep your battery charged as long as possible when running your computer on battery power. At the same time, you won’t have to constantly switch Windows power settings from economical to high-performance, since you have created your own power management mode, in which you set the settings for both cases at once! It is very comfortable.
But you can also customize one of the ready-made Windows power supply options, if necessary. In order to configure any Windows power mode, you need to click LMB on the inscription: “Setting the power plan” located to the right of the selected mode and go to the settings discussed above.
Keep in mind!
If, for example, you bought a computer and have never checked which power management scheme you have enabled, I recommend that you go in and take a look. Otherwise, it may be that your computer is always running, for example, on a balanced circuit, which means that it is not working at full capacity even when connected to a wall outlet! Be sure to make sure that when working from the mains, the “High Performance” mode is set, and when working from the battery, turn on “Energy Saving”. Well, in order not to switch between Windows power settings modes, create and configure your only mode, as described in this article.
That's all. All the best to everyone :) See you soon in the next articles!
In order to use your computer's resources more efficiently, you need to correctly configure your PC's energy consumption settings. Windows 10 in terms of energy saving settings is not much different from previous versions of the operating system.
In order to go to the required “Power Options” section, you need to go to the control panel. This can be done, for example, by right-clicking on the Start button. And select “Control Panel” in the context menu or - if you have a laptop - right-click on the battery icon in the system tray. After that, find the “Power Options” item. To make it easier for you to search in the control panel, in the “View” item, switch the view from categories to icons.
By default, Windows has three performance modes. The “Maximum Performance” mode allows you to enjoy the system to the fullest - however, the energy consumption in this case will be considerable. On the contrary, “Power Saver” allows the device to run longer on battery power. True, at the expense of power. The third option is a trade-off between energy consumption and power. Each mode can be customized at your own discretion. To do this, determine the required scheme and select “Configure power supply scheme”.

Basically, adjusting the power settings is for configuring the computer's sleep mode: you select the optimal time interval for the PC to go to sleep and turn off the display to reduce the computer's power consumption.
Additional power settings allow you to fine-tune your power consumption. For example, you can clarify whether your system will require you to enter a password when waking up, after what period of time the PC will go into hibernation, whether you need to leave power to the USB ports in sleep mode, how the system will react to pressing buttons on the system unit.

If you want to create a power plan from scratch, you need to select the “Create a power plan” option. This item can also help if your power settings go haywire when booting the system. The Setup Wizard will prompt you to select one of three default modes you want to edit and allow you to select a schema name. By optimally customizing each item of additional system settings, you can extend the battery life of your laptop or reduce the amount of energy consumed by a powerful desktop PC.
Type "Scheme" into the Start menu text box and select "Change power plan." Alternatively, right-click the Windows icon and navigate to the Power Options menu bar. Here, in the “Power and sleep” section on the right side of the window, click on “Advanced power settings”.
By default, the system is set to a balanced power supply scheme, that is, a balance is set between performance and energy consumption. The “Energy Saving” scheme is provided for the battery mode. In this mode, the screen turns off faster and the device goes into sleep mode.
 If you want to customize power consumption, click on the “Customize power plan” link. In the window that opens, you can change the preset time or completely disable some options. This prevents, for example, the device from going into sleep mode or turning off the screen completely. Click on “Save Changes” and the settings will be instantly activated.

Additional settings can also be found under Change advanced power settings. In "Advanced Settings", for example, you can select the option to turn off the hard drive after a certain period of time. This saves battery, but when returning to work you will have to wait a few seconds for the device to “accelerate”.

The Power Buttons and Lid option lets you choose what happens when you close the laptop's lid. Select from the following options: No action required, Sleep, Hibernate, or Shut down.
If there is no activity for more than three hours, Windows will in any case send the device to hibernation mode, regardless of whether it is powered from the network or from the battery.
If you want to disable this option, then find the “Sleep” and “Sleep after” item in the settings and set the “Never” option. Confirm the settings by clicking on “OK”. If you click on the “Restore Defaults” button, you can undo the changes you made.
Photo: manufacturing company
Power management in Windows 10 allows you to configure the behavior of the operating system during long periods of inactivity. In particular, you can set an interval from 1 minute to 5 hours, after which, if there is no activity on the part of the user, the screen will turn off and/or the computer will go into sleep mode. You can also completely prohibit these actions. This is convenient when the computer must work all the time, regardless of whether there is a person nearby or not. Let's take a closer look, how to set up power supply in "top ten".
The easiest and fastest way to open Power Options in Windows 10 is to RIGHT-click on the Start menu and select the second item “ Power management" You can find it another way - in Settings (the gear icon in the Start menu or Notification Center). There, first select the “System” section, and then in the left column go to the “Power and sleep mode” item.
If you are working on a desktop computer with Windows 10, then you will have only one option for controlling turning off the screen and switching to sleep mode - when powered from the network (as in the image below), but if you are using a laptop or netbook with ten, then additionally The same settings will appear when the device is running on battery power.
So, here you can set the period of time after which in case of user inactivity the monitor will turn off or the computer will go into sleep mode, which allows you to significantly save energy, but at the same time keep all programs running and windows open. The interval is set in both minutes (from 1 to 45) and hours (from 1 to 5). Also in all cases you can choose "Never" setting to prevent the display from turning off power and entering sleep mode.
If you are one of those for whom the presented power settings options are not enough, then you can click the “Advanced power settings” link and advanced settings will open in a new window - they look the same as in the beloved Windows 7 operating system.

Here you can not only choose the appropriate power supply scheme: energy saving, balanced or high performance, but also make more subtle adjustments. In particular, in the left column there are items by clicking on which you can configure the action when you press the power buttons or when you close the lid (for a laptop). This allows, for example, to make sure that when you close the laptop, the operating system automatically shuts down or goes into hibernation mode.
Also here you can configure the power supply scheme used in more detail by clicking “Configure power supply scheme” opposite the desired item and in the new window selecting “Change additional power settings”.

You should change the settings in this window only after thoroughly understanding what they are responsible for and how they work. However, even if something was done wrong, you can always restore the default values in the power settings.
Change how your computer uses power when plugged in or running on battery power, and learn about your shutdown and sleep options.
Modify power management schemes to suit your needs
Power plans are sets of software and hardware settings that determine how your computer uses power. Choose from preset power plans to consume less power, maximize performance, or find the perfect balance between the two. You can also create custom schemas to suit your performance needs.
Windows enables normal shutdown mode for faster shutdown, or full shutdown mode for long-term storage, updating components, and diagnosing problems.
Using sleep mode
If the computer is idle for a period of time, the computer enters a sleep mode that uses less power. In this mode, all applications remain open for quick launch when the user returns to the computer. This mode uses lower power consumption and is recommended when the user is away from the computer for a while. You can manually enter sleep mode or set the computer to automatically enter sleep mode after a period of inactivity.
To manually enter sleep mode, click the Windows icon, click Power Options, then click Sleep. Follow these steps to change when your computer automatically goes to sleep.
Using Hibernation Mode
If the computer is inactive for a while, hibernation mode turns off the computer but leaves some applications open for quick launch when the computer turns on. Hibernation mode uses less power than Sleep mode. This mode is recommended if you plan not to use the computer for some time. Add Hibernation Mode to the power menu and set your computer to automatically go into hibernation mode after a period of inactivity.
Change what happens when you press the power button
Choose options for sleep, hibernation, display, and shutdown when you press the power button.