How to make a fill in Photoshop on a disk. Replacing the background in Photoshop - detailed photo instructions
"Marvelous! Simply extraordinary! This can't be! — these are some of the exclamations you may hear from people who see the new content-aware fill features of Adobe Photoshop CS6 in action. Indeed, companies
Adobe managed to do the impossible, opening a new page in the field of computer graphics.
How often have you seen beautiful photographs ruined by the appearance of an unwanted object in the frame? I think all the time. Sometimes you can spend hours in Adobe Photoshop trying to remove a random passerby from a high school reunion photo or unwanted graffiti on a wall.
In Adobe Photoshop CS6, a solution to the problem of removing unwanted objects has been found. Moreover, for these purposes there are two methods: filling taking into account the content and the possibility of the corresponding function in the Spot Healing Brash Tool.
The essence of this function is as follows: the program replaces the area you have selected with an image based on the objects surrounding the area. This way, you can easily remove the person in front of the brick wall from the frame: select him, then use the Content-Aware Fill feature.
https://www..jpg" width="435" height="331 src=">
Rice. 6.19. Photo after processing with the “Fill based on content” effect
2. Select the unwanted object using any convenient tool in Adobe Photoshop CS6. To obtain the most natural results, it is recommended to create selections not along the very edge of objects, but somewhat capturing the background of the object. The Lasso Tool and the Polygonal Lasso Tool are perfect for this type of work.
3. Select the main menu command Editing -> Fill. The Fill dialog box opens. This dialog box can also be called up using the key combination Shift+F5.
4. In the Fill dialog box, in the Use drop-down list, select Content-Aware.

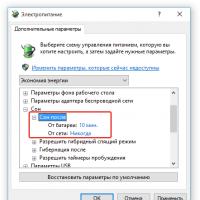
Rice. 6.20. Content-aware padding options
5. To completely replace the selected area with a new generated image, in the Blending control group, in the Mode drop-down list, select Normal, and in the Opaque input field. (Opacity) set the value to one hundred percent.
6. To apply the function, click OK.
The selected area is filled with the image based on the elements surrounding it. You may notice that the image generated by the program looks quite natural. Experiment with the shape of your selection for best results. When working with complex images, you can use the Spot Healing Brush Tool, Clone Stamp Tool and others to mask characteristic “seams”.
For most basic image editing operations, the functions included in the Paint graphic editor distributed with Windows are sufficient. The only inconvenient thing is that it lacks the ability to place several pictures on different layers at the same time. This option is available in the Adobe Photoshop editor, so many image manipulations are easier to do in it. For example, this refers to filling the background of a finished image with a different color.
You will need
- - Graphic editor Adobe Photoshop.
Instructions
Good day everyone, dear readers of my blog. How are you? Are you ready for work and defense? Great. We have learned, but what if you need to paint over some area? Are we really going to puff ourselves up to carefully paint over the area with a brush, trying not to touch the borders? Of course not.
One very interesting tool will help us completely paint over an object in one click. Just today I will tell you how to make a fill in Photoshop using the tool of the same name.
What exactly does the fill tool do in Photoshop? Yes, it's quite simple. He paints the area you want. But here we need to take into account various factors. In general, am I telling you some kind of naked theory? Let's look at a specific example.
So, let's go!
Simple fill
In general, since the circle inside was completely white, and the background outside was also completely white, the entire area would be filled until it encountered an obstacle, such as the third and fourth circles.
Now take another color of any color and fill the area where the circle intersects. Only this area of intersection is painted over. But why? After all, we drew 2 different circles? Yes, because we drew them on one layer, so they are considered a single whole. Now, if two circles were drawn on two layers, then it would be a different matter. One of the circles (on the active layer) would be completely painted over. But it’s better to read about layers.
I just noticed that I have these two circles with a filled red area in the center, they look like an eye with a red pupil))).
Painting with a pattern
By default, the tool paints with the color specified in the main color of the palette. But you can also paint over areas with a pattern. Let's try.

Tolerance
Many instruments have such a property as tolerance. And everywhere this tolerance works approximately the same.
The smaller the tolerance, the smaller the color range of the painted area. Those. if tolerance 0 and you want to paint with white on a blue-blue background, then only the shade that you clicked on initially will be filled, and of course all the exact same shades do not deviate one gram from the norm. And if the tolerance is maximum ( 255 ), then the fill will paint over the entire canvas without exception.
Let's look at an example, and then you can experiment for yourself. Let's take a square as a basis, which changes its color smoothly from yellow to white. Let's try to set different tolerance values and paint them black.

As you can see, the greater the access, the more he uses the range of colors that he considers native and the more colors and shades he paints. I hope you get the gist. Got it? If not, then ask. I will answer.

By the way
Finally, I want to tell you about one more point. It is not necessary to fill any drawing with color. You can simply fill the area.
To do this, select some area (I chose ) and draw a selection on a white background.

Now I pick up the fill again and choose any color. The selection hasn't gone away, and that's great. Then fill in what is inside the selection outline in a way already known to us. Hop! And you're done. Here's a little trick.

Well, although these are not all the properties, they will be quite enough for you. If you want to study Photoshop more thoroughly and in detail, and also “swim” in it like a fish in water, then I highly recommend that you check out this video course. I haven't seen anything better yet. If I had it before, then learning this graphic editor would have been much easier for me. Overall I highly recommend it.
Well, I’m finishing our lesson for today, dear friends. I hope that the article was useful to you and I strongly recommend subscribing to my blog updates, then you will not miss the release of new and useful articles, as well as various news and competitions.
Good luck with your studies. The main thing is not to philander). See you in the next lessons. Bye bye!
Best regards, Dmitry Kostin.
In this lesson we get acquainted and learn to use the PaintBucket and Crop tools.
The Fill Tool is in the same group as the Gradient Tool, so sometimes it is hidden from our eyes. The tool has several parameters that significantly affect its operation. Naturally, they are all located in the Options palette.
Fill: PaintBucket tool.
 First, let's find this tool. It's in the Tools palette and looks like a bucket. But the fill tool is in the same group as the gradient tool, so sometimes it is hidden from our eyes. If instead of the desired bucket you see the gradient tool, then click on the triangle below it and select from the list that opens, as shown in the figure. The principle of operation of the tool is to fill the area in the drawing containing the color that you pointed to with the tool and shades of color similar to it. Therefore, PaintBucket is used to fill uniform areas with color.
The tool has several parameters that significantly affect its operation. Naturally, they are all located in the Options palette.
Filling method Fill tells the tool what to fill with - the foreground color or the pattern. You can select a pattern swatch nearby from the Pattern drop-down list. We will learn how to set our own patterns a little later.
Parameter Mode sets the blending mode of the fill with the background image. All modes were discussed in the section "Brush tool. Brushes palette" of the first lesson.
Parameter Opacity determines the opacity of the fill, the effect of which is identical to the opacity of the brush.
The similarity of color shades is determined by the parameter Tolerance(Admission). Photoshop creates a range of colors by adding and subtracting the Tolerance parameter from the color brightness of the selected pixel. A small tolerance value will cause the tool to only affect those pixels that are close in color to the selected one. A large tolerance value will allow you to fill pixels with a wide range of colors that differ significantly from the selected one. The figure shows the result of filling an image with different values of the Tolerance parameter. 
Checkbox Anti-aliased includes the so-called edge smoothing. If you look closely at any non-horizontal or non-vertical line, it is easy to notice that it is not smooth, but seems to consist of many small rectangles. The Anti-aliased function smoothes the edges of the fill, filling them with pixels of intermediate colors. We get visually smoother, but not seemingly blurry, color boundaries that successfully hide the pixel structure of the screen from perception.

Enabled checkbox Contiguous
(Contiguous areas) indicates that only adjacent areas can be filled, i.e. bordering each other. Let's draw an analogy with real life. If in the path of spreading paint there is a barrier that limits the area filled with this paint, then the paint will not be able to flow beyond its limits. In our case, the barrier is a color that is too different from the specified one. Those. By turning on the Contiguous flag, we erect such a barrier to the color spreading. If it is turned off, then all occurrences of the specified color in the image are filled. Think about how to optimally change the color of all the black cells in the image? In what position should Contiguous be?
Personally, I think it should be turned off unless you want to do 30 clicks instead of one. :)
Checkbox Use All Layers(use all layers) allows you to fill pixels with similar colors on all layers of the image. The fifth lesson will be devoted to working with layers.
Very often, as a result of poor-quality scanning, photographs end up with unpresentable edges. The fastest and most effective option for correcting this type of defect is pruning. When cropping, only the part of the original image that is highlighted by the frame remains. Everything else simply disappears. This operation is carried out using tool Crop(trimming).
To crop a picture you need to do the following:
- Turn on the Crop tool.
- Draw a frame with it (holding the left mouse button). If you hold while drawing Shift, then the frame will be proportional if you hold Alt, then the frame will be drawn from the center.
- Fit the frame to the area you want to leave, and keep in mind that anything left outside the selection will be lost.
- After adjusting the frame to the required area, simply press Enter or double-click inside the selected area. You can also select the menu item Image > Crop.
The tool has a number of interesting and useful settings. Let's look at the Options palette.
Fields Width(width) and Height(height) specify the width and height of the resulting image in the units you specify, respectively. In the picture, for example, the width and height of the result are set to 50 pixels each. The following abbreviations are used here:
- px - pixels,
- cm - centimeters,
- mm - millimeters,
- in - inches.
If you write a number without specifying units, the image dimensions will be set in the units specified in the Photoshop settings. I advise you not to wait for mercy from nature, and always indicate specific units. It should be noted that the proportion between width and height will no longer depend on your desire, and will be determined by the Width and Height parameters. If we specify the parameters as in the figure, then when we drag the frame, its width will always be equal to its height. That is, a square area of the image will be selected. After double-clicking or pressing Enter, the side of the square will become 50 pixels. If you want to determine the size of the frame and the ratio of its width to height yourself, simply leave the Width and Height fields empty. Then the result will be exactly the way you select it.
Resolution- resolution of the resulting image, i.e. a value indicating how many pixels fit in one real unit of measurement. This can be an inch or a centimeter, the following parameter selects this unit:
- pixels/inch - pixels in inches,
- pixels/cm - pixels in centimeters.
You want to print a digital image with a resolution of 300 dpi (dots per inch - the number of dots per inch, which corresponds to the considered pixels/inch value) in a format of 9x13 centimeters. You need to set the following Crop tool parameters:
Width - 9 cm
Height - 13 cm
Resolution - 300 pixels/inch
Then you select part or all of the image with this tool, apply cropping and enjoy the result.
Button Front Image assigns the width, height and resolution parameters equal to the original dimensions of the image. Thus, when cropping the edges of the picture, its overall size does not change, because the remaining part of the picture is automatically enlarged to the original dimensions of the entire image.
Button Clear clears all Crop tool settings. This is useful if you want to switch back to free cropping mode.
- Views: 33598
Sometimes, when editing digital photos and creating images, it becomes necessary to evenly fill a certain part of the image with a color or uniform tone. And if you use the tools of Adobe Photoshop, then this is not difficult to do.
How to fill a layer in Photoshop
The operation of filling a layer can be carried out in several ways. Let's look at the instructions.
- From the Edit menu, select the Fill command. But before that, you need to select the area on the digital image that will be filled. You will see a fill settings window. Here you can select any fill type and color. You can also select the transparency level and fill algorithm from the drop-down menu. Thus, it is possible to choose the method and depth of influence of the effect on the original drawing. Thanks to the Fill command, you can fill a layer with color.
- It is also worth noting that in this method this operation can completely change the digital information of the image. In the future, it will no longer be possible to change or adjust the parameters of the original image. But you can use the “Rollback” command. This command will undo previous operations. That is, all the work done after pouring will be gradually removed.
- The second method is simpler. In the Layer>New Fill Layer menu it is possible to create an additional special layer of the Fill Layer type. This layer will occupy exactly the space that was specified when selecting the image. And just like the Fill command described above, it will visually implement the same function. You can change the parameters of the layer you created as much as you like. Moreover, without any distortion. That is, now you will know how to fill a new layer on a photo. Thanks to this method, it is also possible to create layers with gradient fills. Here the gradient parameters include different transparency options for this layer.
- There is also another way to fill a layer. For example, if the layer is an outline or a cutout shape and does not take up the entire image space. Each layer in Photoshop has individual style settings. In the individual settings menu, select the items: Gradient Overlay, Pattern Overlay and Color Overlay. This is a coating of gradient, pattern and color. At each of these points there is an opportunity to fill the entire layer accordingly. There is also a wide range of settings: both your own filling algorithm and the color spectrum and overlay method. And no changes are made to the original file information. That is, the image is saved and the ability to change the fill parameters is saved.
Now you know how to fill a layer on a photo. And let the collection of your own photographs be unforgettable!