How to change the resolution of a picture without changing the dimensions. How to increase the size of photos while maintaining original quality
The desire to resize a photo appears when there are unsuccessful shots (when unnecessary and superfluous details are captured), placement of an avatar (on a personal page on a social network, in a forum on a website, in an online store), creating various photo portfolios and under other circumstances. There are special tools for this.
You can resize a photo in three ways: using standard programs in the Windows operating system, using third-party programs, and online via the Internet. Let's look at each method in more detail.
Three easy ways to resize a photo
How to resize a photo in paint
All versions of Windows have a Paint program. Launch it and click the “menu” button in the upper left corner. Select “Open” and find the photo you want to edit. We load it into the work area. Next, if you need to trim it, select the appropriate item in the top panel of the program. Using the cursor, we determine the area of the photo that needs to be left. We crop and save the result.
The second option is to select the “Select” function. Select the desired area of the photo and press the key combination Ctrl+X (cut). Next, open the Paint program again. The work area in it is empty, point the cursor there and press the key combination Ctrl+V. The photo fragment is inserted into a new Paint document. If the white background of the working area is larger than the inserted photo, you can reduce it using the same cursor. We successfully save the result.
There is a third option - when you need to reduce the photo to certain pixels. Select the “resize” item at the top of the program.

Windows 7 has a Picture Manager program. It is very similar to Paint. Launch it and select “File” in the upper left corner. Click on “Find drawing”. We find a photo. Next, select the “Drawing” item, there are two processing options - “Crop” and “Resize”. You need to use them in the same way as with the functions of the Paint program. We change the image and save it safely on the computer.
How to resize a photo using programs
There are many quality programs from third party developers. Particularly worth highlighting:
— Image Resizer,
— Movavi photo editor,
- Adobe Photoshop CC,
- PIXresizer
— Fotosizer,
— BImage Studio, etc.
Most of them are free and freely available on the Internet. The download and installation process will take from 5 to 30 minutes. As an example, consider the Image Resizer program.
We find it using a search engine, download it, install it on the computer, and launch it. A program window opens in which you need to click on the Add files menu. Then select the desired photo and go to the Settings section.

In the settings, enter the desired size and click Run. The photo with the new dimensions is saved to the desktop in a folder specially created by the program. Ready!

Download Image Resizer— https://light-image-resizer.ru.uptodown.com/windows
How to resize a photo using online services
As well as third-party programs, there are many online services on the Internet that offer to crop a photo or change its size by entering pixels. The most popular and frequently used of them are:
- imgonline.com.ua,
- resizepiconline.com,
— croper.ru,
-resizenow.com
- inettools.net,
- optimizilla.com.ru,
- reduction-image.com,
- pichold.ru.
Let's take a closer look at the imgonline.com.ua service. Go to the website and click on the Resize tab.

Next, click the “Select file” button. Find a photo on your computer and upload it. Next, enter the desired width and height in pixels. Select the type of resizing. If necessary, make additional settings, select the format of the future image and click “OK”.

A new page with information about the photo will open. There are two options - either open the photo for viewing (if you don’t like something, you can “Go Back”), or download it. Ready! The photograph has received new dimensions.

In general, the use of the listed methods is very simple. The main thing is to follow the prompts and enter data in the required fields. The output will always be a high-quality image with the required pixel parameters.
Those users who are wondering how to change the size of a picture can use specialized programs to solve this problem.
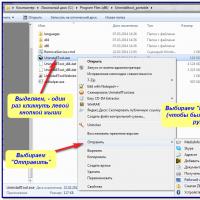
One of these is programInfanView, which is simple in functionality and also works great on any computer. Let's look at how to use the program using this screenshot as an example:
Picture size The one that requires reduction is indicated by an arrow and it is obvious that it is quite large, which means that the image itself weighs a lot. By simultaneously pressing the keys Ctrl+
R, a menu for changing the number of pixels opens. 
Here user sets the desired size and, accordingly, dimension, and also, if necessary, can maintain the proportions of the original version. After editing, the picture can be saved through the menu or combination Ctrl+ S.
More advanced users and owners of powerful computers can use a fairly popular program - Photoshop. Having loaded the desired image into the program and determined its dimensions, you should go to the menu section Image > Image Size.
In the window that opens, as can be seen from the screenshot, you can vary all the parameters associated with changing the picture, and in the future the material can be saved in any format.
How to change a photo in Paint
One of the simplest and fastest ways to resize a picture is to use the standard Paint program, which is available in any version of Windows. Depending on the version, the program may have a different interface, but the procedure will be the same. 
When you open an image or photo, you can see at the bottom of the screen picture dimensions. In the top menu bar or on the toolbar, you should find the function responsible for resizing, an example is shown in the screenshot. By clicking on it, a window will open similar sample: 
This method is the simplest, and therefore has less functionality, but it solves the problem under consideration perfectly.
Using online services
In certain situations, it is much faster and more convenient for the user to use some online service that allows you to resize images. Of course, such services exist, and they allow you to perform all the necessary operations directly in the browser. One of such services is - imgonline. com. ua
To start working with this site, you must have the image you are looking for on your computer or device. The working area of the program looks like this: 
Here, all the actions are already described step by step, and therefore any user can easily and quickly do everything that is necessary. At the exit get itv picture, which can be downloaded or immediately sent somewhere.
Another service with similar functionality is – inettools. net
After uploading the desired image, the user will see this working field: 
A noteworthy point is that here you can quickly edit several photos one after another, or for all selected pictures apply single type adjustments.
The following site is called - resizepiconline.com
Working with it consists of four steps, where the first is loading the source material, and the fourth is saving the result. The actual process of image editing occurs at stage No. 3, where, using convenient sliders, you can quickly and clearly change parameters.
Upon completion of work, the finished material can be saved or its network address can be obtained.
How often, while looking through photos on the computer, we have thrown away great shots because they turned out to be too small in size and of poor quality. But with the help of special programs you can save almost any image!
Improving image quality is a very voluminous topic. To improve the quality of photos in Photoshop, color correction, sharpening, retouching and many other operations can be used. All of them require certain skills and mastery of special techniques.
But there are also less complex methods when you simply need to enlarge the image without losing quality. Below we will look at an example of how to improve the quality of a photo if you need to enlarge the photo without losing quality.
How to enlarge a photo without losing quality
We've all had to deal with small, low-quality images. In such photographs, when enlarged, the pixels, the points from which the raster image is constructed, are clearly visible.

Enlarging the image by stretching it and freely transforming it will only make the situation worse.
In this tutorial, the work will be done in Photoshop CC 2017. But first we will look at the method for other, older versions of Photoshop. And then we'll show you how Photoshop CC 2017 can do the whole procedure automatically.
Open the image in Photoshop. Now we will gradually increase it in several passes. It’s worth noting right away that you can enlarge a photo and improve the quality, but with a size limitation.
Press the key combination Alt + Ctrl + I. A window will open "Image Size". It is necessary that between "Width" And "Height" a paperclip was pressed. Then the width and height will change proportionally.

Let's enlarge the image twice, each time by 20%. To do this, in the drop-down list opposite "Widths" change the pixels to percentages (Pixel/Percent), and the numerical value from 100% to 120% and click Ok. Then call the image size window again ( Alt + Ctrl + I) and increase by 20%.

We increased the image size from 950x632 pixels to 1368x910 pixels.

For a visual comparison, let’s zoom in on the original image (950x632 pixels) and the resulting one (1368x910 pixels).

We enlarged the image by almost one and a half times and even improved the quality. As you can see, the pixelation is less noticeable if you zoom in on the image.
It remains to finalize the result. Let's apply a filter "Smart Sharpen" to the resulting image.
Let's go: “Filters”/“Sharpening”/“Smart Sharpening”/Filter/Sharpen/Smart Sharpen. Move the sliders to select the appropriate sharpness. If you left-click and hold on the image in the small preview window, you can see the image before the effect is applied. The difference is palpable. The smooth transition of color (without cubes) on the lenses of the glasses is especially noticeable. We removed the noise completely by moving the slider all the way to the right. The sharpness radius was taken at 0.3 pixels, the effect was applied at 79%.

Let's compare the results again.
On the left is the original image, in the center - after resizing, on the right - with application "Smart sharpening".

After use "Smart sharpening" The noise in the photo has gone away and the image has become clearer.
Here is our result.

Now let’s enlarge the photo and improve its quality using automatic tools in Photoshop 2017.
Open the image in Photoshop, press the keyboard shortcut Alt + Ctrl + I. A window will open "Image Size". Please note the point “Fit to”/Dimensions. Expand this list. In it you will see blank options for enlarging/reducing the image without losing quality. Let's use automatic selection (second item in the list). In the window that opens, select the item "Good" and press Ok. There is no point in choosing the best one, since the original image is of too low quality, and there is no point in enlarging it that much.

Please note that if we managed to enlarge the image from 950x632 pixels and a resolution of 96 pixels/inch to 1368x910 pixels with the same resolution, then the program increased it to 1969x1310 pixels with a resolution of 199 pixels/inch.

Let's apply Smart Sharpening.

Now you have seen for yourself that you can enlarge a picture without losing quality, and at the same time even improve the quality of the photo.
It is worth noting that this method can be useful not only for enlarging and improving small photos. For example, you need to provide a photo for an online resource or for printing in a publishing house. Your photo is of excellent quality and large size, but the publishing house needs an even larger size. By applying the described method of enlarging a photo and improving its quality, you will get an excellent result. After all, large photos with good quality will go through this procedure much easier.
The procedure is extremely simple. Don't give up on small pictures. Give them a second chance.
It is the use of high-quality and at the same time light-weight graphics. Therefore, for websites, the issue of the size and weight of pictures is especially relevant. Let's consider several options that will allow you to resize the image according to the desired parameters: using the program and resizing pictures online.
Changing the weight and size of an image using Photoshop
Photoshop is one of the programs that is simply necessary for designers and those who make websites on their own. And any other user will find this program useful. After all, with its help you can quickly and easily correct your photos, cut pictures, and effectively process any image. The program is paid, but you can still find “free” versions on the Internet.
For those who do not want to purchase the program or search and download it from the Internet, to change the size of pictures, the second part of the article.
So, the program is installed and activated. Let's launch Photoshop and open the image whose size and/or weight needs to be changed. This is done through the menu " File» — « Open» (« File» — « Open«):
After the image opens in Photoshop, let's start resizing it.
Distorted or proportional resizing
This is the easiest option to change the natural size of the picture. Everything is done very simply - through the menu " Image» — « Image Size» (« Images» — « Size images"). Another option is to press the keyboard shortcut ALT+CTRL+I.

A pop-up window will appear, with the help of which the resizing process occurs:
- indicate the width
- height
- if it is necessary to prevent the image from being stretched or narrowed, check the box “ Maintain proportions«

Press the button " OK "and the picture will automatically take on the specified dimensions.
Resize the image visually and with the desired proportions
To do this, you also need to open the desired image in Photoshop. Then, click on the special icon in the left corner - the frame icon and set the resizing proportions:

At the top, where the width and height are indicated, we set the required proportions and select the desired part of the image. The selection frame will automatically take on the cropping proportions we need. After selection, click anywhere in the program’s work area Photoshop and the picture is cropped.
Now, if the image was large or small, not meeting the dimensions we needed, you should follow the steps described just above. (using the menu " Image» — « Image Size"). Saving the resulting picture is done through the menu “ File«.
Optimizing images for the site
To reduce the weight of an image for use on your website, in the program Photoshop There is a special weight reduction function. Absolutely any image, which in its normal form weighs a large number of kilobytes, is compressed, and you can visually control the resulting quality.
So, to optimize an image, you need to first open it, then resize it (if necessary). Open the menu “ File", click on the item " Save for Web and Devices..." is the 17th line from the top in this menu.

After this, an additional window will open, in which there will be our picture and blocks on the sides with various settings:
- Selecting a file type. This is an important point - you can embed on the site and PNG And JPEG With GIF, only the weight of such files with the same quality will be different. If the picture has the most dark and white colors, or the number of colors is minimal, then it will be ideal PNG-8. Especially when the final result is a monochrome drawing.
- Colors - the number of colors in the output. For black and white or gray images, an amount of 8 is suitable.
- Transparency - Having transparency adds weight, but sometimes it's just necessary.
- Quality - with the help of this adjustment and online viewing of the resulting quality, the weight of the image in the format is reduced JPEG.
- Dimension - in the same window you can change the size of the image.
For comparison, let's look at the process of saving the same picture in different formats and determine the final weight of each resulting file.
Let's say there is an image in the format JPG with an initial weight of 250 KB and a size of 640 by 472 pixels.

Let's try to reduce the weight of this image. To do this, follow the steps described just above. We find that the optimal option for saving an image in the format Jpeg- these are the following settings in the window " Save for Web and Devices«:

With virtually no visible changes, we managed to reduce the weight of the original image from 250 KB to 14.96 KB!
Now let's save the image in the format PNG. The settings that compressed the image as much as possible are:

The image quality is noticeably worse than when compressed in the format Jpeg. We managed to get a weight of only 85 KB, which is much more than when saving in JPEG.
Resizing pictures online
To resize pictures online, you need to use the service Pixlr.com is a wonderful online service that is stripped down in functionality Photoshop.
How to immediately change both the size and weight of an image online
Go to the website http://pixlr.com/, an environment of three different online editors, select the first one - “ Pixlr Editor«:

Online Photoshop starts and a pop-up window appears on the screen where you need to select or upload a photo or picture that you want to change:

There is the same menu as in the standard program Photoshop. To change sizes, you can use the same actions as in the program itself.
The size of images is adjusted when saving them:

Let’s imagine that the question of how to resize picture without photoshop? At the same time, you are on the Internet, and you need to crop a photo or picture for the questionnaire. You will do the right thing if you sit at your computer, or with a tablet, or with a smartphone in your hands, and go to the site.
After all, on this resource you can use an application for cropping photos online. Please note that the application supports gif, bmp, jpg, png formats. It is located in the “Working with Images” block called “Cropping Images”.
And, performing simple operations here, we resizing the image. After all, like everything else within the service, this application is very easy to use. It provides the opportunity to get high-quality results very quickly.
With his help we resize photo. We trim it. And to do this, you just need to upload the desired image, select the fragment you need to trim and press the “Cut” button, having previously received information about the size of the future image. That is, the process involves a percentage increase or decrease in the image. There is always the opportunity to see how you cropped the photo and then save it.
What other features does the application provide?
When we resize a photo online, this does not mean that the whole process, which takes a matter of seconds, boils down to simply cropping the image online.
Anyone working with the image can still spend additional (but literally just a matter of) seconds to rotate the photo or flip it if necessary. But this is not all there is to it. You can also add beautiful effects or a frame. And all it takes is a few clicks.
It is not surprising that the site’s users are people of various professions, ages and even hobbies. This is because some people prefer not to search for the application they need on various Internet resources. And this online service is good for many because it concentrates a wide variety of but frequently used applications.
And many of those who spend a lot of time on the World Wide Web (including in order to change photo), end up on the site quite naturally. Whether he is a designer or a webmaster, a journalist or a motorist. After all, many links on the Internet lead here, and the service is available to everyone without registration.
The service is also free. It can be used when preparing photos and music for blogs and websites. In addition, there is no need to download files, install and subsequently update programs.
This is appreciated both by those who are engaged in professional photography and by those for whom spending time with a camera is simply a great hobby. After all, the site has a suitable application for them. For example, for someone who is tormented by the question, how to resize an image?
Why is such a function needed?
The reason why one or another Internet user is forced to look for an online photo editor to use may be different. But, as experience shows, this is usually caused precisely by the need to quickly resize photo.
And this is usually the case. Let's say someone needs to upload an editable image to a website. For example, as a VKontakte avatar. As a rule, on most resources on the global network, images that are uploaded to the service have a size limit. And this in this particular case means that you need to resize the photo online.
There is no way to do without this. However, the limitation is not only for dimensions. The limitation also applies to the weight of the image. That is, the problem requires such a solution when you need to reduce the photo. And this is very easy to do using an online photo editor.
But the “enlarge photo” function is used when it is necessary to increase the size of the image. Just like photo reduction, this function is used when someone processes an image very often.
For a more detailed description of the popular service, we should also mention such a “trick” as Instagram-style photos. That is, in this case, the service provides the opportunity not only resize, but also to give the desired look to the photographs. Moreover, we are talking about those cases when you do not have a mobile device and an Instagram account with you.
We assure you that processing photos on a personal computer is much more convenient and enjoyable. The “Instagram style photo” feature works exactly the same as online photo cropping. This means the following: you need to upload a photo, apply effects and then save it to your computer. So, in particular, you can create the effect of an old photograph from an ordinary photograph.