Restoring Windows after replacing the motherboard. Replacing the motherboard without reinstalling Windows
If you are going to update/replace the motherboard, but do not want to reinstall Windows, drivers, programs, or you want to switch the operating modes of the SATA controller from IDE to AHCI or RAID (or vice versa), then this article is just for you!
Often, when you change the motherboard and start the PC without reinstalling Windows, you may see a “blue screen of death” (BSOD) with the error STOP 0x0000007B INACCESSABLE_BOOT_DEVICE.
The reason for this unpleasant picture is the inability of Windows to find the appropriate drivers for the SATA controller. This problem can be easily fixed without reinstalling Windows. To do this, all you need to do is “order” the operating system to use the standard SATA controller driver at startup, which is loaded after a clean reinstallation of Windows. And the registry editor will help us with this.
Running “old” Windows on a new motherboard
To make changes to the Windows registry, simply follow the instructions below:
Before proceeding further, you need to decide on the following:
1. You are just about to replace the motherboard or change the IDE/AHCI operating mode and your PC is operating in normal normal mode, Windows starts
2. You have already replaced the motherboard and Windows will not start. In this case, you will have to use the offline registry editor.
1. Changing the registry before updating the motherboard or controller settings
This section is suitable for those whose PC starts normally and you are just going to replace the motherboard. Open, to do this, press the buttons " Win+R” and in the window that appears, type ““, then click Enter.
The Registry Editor opens for us. It looks like a “tree” with a bunch of folders and settings:

We need to go to the branch:
HKEY_LOCAL_MACHINE\SYSTEM\CurrentControlSet\services\msahci
We find the Start parameter there and set it to “ 0 " (zero) and press the button " OK»

HKEY_LOCAL_MACHINE\SYSTEM\CurrentControlSet\services\pciide
and do the same with the Start parameter

If you use Raid (if not, skip this step) then you need to do the same in the next branch:
HKEY_LOCAL_MACHINE\SYSTEM\CurrentControlSet\services\iaStorV
This completes the preparation. Now you can install a new motherboard or change the parameters of the SATA controller. The next time you start Windows, it will boot with standard sata controller drivers. After startup, the drivers for the new controller will be automatically installed. After downloading, do not forget to install the new motherboard drivers that are included in the kit, or download them from the Internet. It is best to download original drivers from your motherboard manufacturer's website.
2. Changing the registry after updating the motherboard (windows does not start)
If you have already changed the motherboard and there is no way to boot Windows, for example, the old one has failed, then in this case you need to use an offline registry editor. To solve this problem, I prefer to use a recovery environment, which can be accessed, for example, using an operating system installation disk.
To open Registry Editor using the installation DVD or USB drive, boot your computer using the installation disc. You may need to select DVD/CD or USB as the first boot device in BIOS settings.
After loading, on the very first screen, click “Next” and then select “System Restore”.

If you have Windows 7, then on the first screen click next, then launch the command line

If you are using Windows 8.x or Windows 10, then you need to go to Diagnostics -> Advanced Options -> Command Prompt.

In the command line, enter and press Enter.

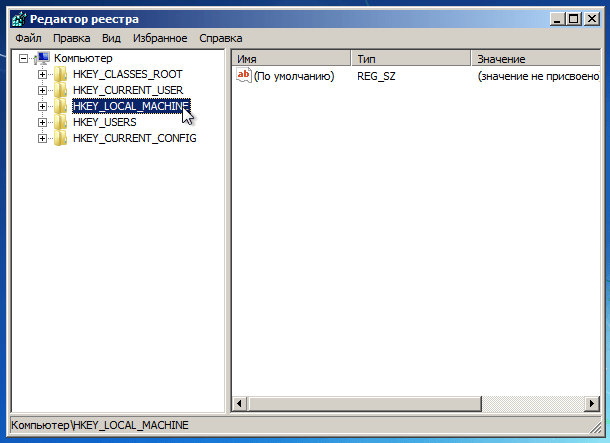
In the registry editor, select the branch HKEY_LOCAL_MACHINE, and from the File menu, click Load Hive.
Open the drive on which the operating system is installed.
Go to the Windows\system32\config directory, select the file system and click "Open".

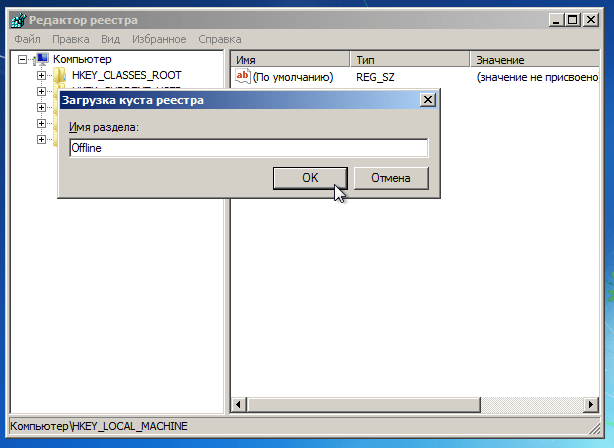
Enter a name for the section (for example, Offline) and click OK.
By expanding the HKEY_LOCAL_MACHINE branch, you will see the created section (in our example it is called Offline).
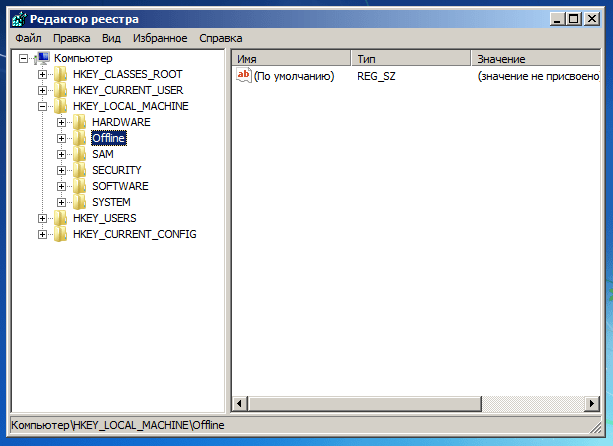
Expand the new section and go to the following subsection:
HKEY_LOCAL_MACHINE\Offline\ControlSet001\services\msahci
Open the Start parameter, change its value to 0 (zero), click OK.

Perform the same operation in a subkey:
HKEY_LOCAL_MACHINE\Offline\ControlSet001\services\pciide
Close Registry Editor, Command Prompt, and restart your computer. Remove the installation disc so that the operating system can boot normally. Windows should now start without any problems and then install the necessary hard drive controller drivers. Don't forget to install the drivers for your new motherboard later!
Conclusion
With this simple method you can save your working Windows operating system and all the programs installed on it when changing the motherboard or changing the parameters of the sata controller without reinstalling the system.
I hope this article was useful!
Quite often, a situation occurs when a user who has upgraded a PC and replaced its motherboard, then has to reinstall the system on the hard drive, and, accordingly, reinstall all previously installed programs. This is due to the fact that the PC simply does not want to start and displays a “blue screen” or other error when trying to activate. Let's find out how you can avoid such inconveniences and replace the motherboard without reinstalling Windows 7.
The reason that the described situation requires reinstalling Windows is the inability of the previous version of the OS to find the required drivers for the SATA controller of the new motherboard. This problem is solved by editing the registry or pre-installing drivers. Then you won't have to reinstall the system software.
The algorithm for setting up Windows 7 depends on whether you do it before replacing the motherboard or after the fact, that is, when the reinstallation is completed and an error is displayed when starting the computer. Naturally, the first option is more preferable and a little easier than the second, but even if you have already changed the motherboard and cannot start the OS, you should not fall into despair. The problem can also be solved without reinstalling Windows, although this will require more effort.
Method 1: Setting up the OS before replacing the board
Let's immediately look at the procedure when setting up the system before the motherboard has been replaced.
Attention! Before you begin to apply the steps described below, be sure to check the system registry.
- First of all, you need to see if the drivers of the old motherboard are suitable for replacing it. After all, if they are compatible, then no additional manipulations need to be performed, since after installing the new board, Windows will start in normal mode. So click "Start" and open "Control Panel".
- Next, go to the section "System and safety".
- Click on an element "Device Manager" in the block "System".

You can also type on your keyboard instead of these actions Win+R and enter the expression there:
After this you should press "OK".

- In the opened "Dispatcher" click on the section name "IDE ATA/ATAPI controllers".
- A list of connected controllers will open. If their name contains only the name of the controller type (IDE, ATA or ATAPI) without the name of a specific brand, this means that standard Windows drivers are installed on the computer and they are suitable for almost any model of motherboard. But if in "Device Manager" the specific name of the controller brand is displayed, in this case you must check it with the name of the controller of the new “motherboard”. If they are different, then in order for the OS to start without problems after changing the board, you need to perform a number of manipulations.
- First of all, you need to transfer the drivers of the new motherboard to your computer. The easiest way to do this is to use the software disk that came with the motherboard. Just insert it into the drive and download the drivers to the hard drive, but do not install them yet. Even if for some reason you don’t have the media with the specified software at hand, you can download the necessary drivers from the official website of the motherboard manufacturer.
- Then you should remove the hard drive controller driver. IN "Dispatcher" double-click on the controller name with the left mouse button.
- In the controller properties shell, navigate to the section "Driver".
- Next click on the button "Delete".
- Then, in the dialog box, confirm your actions by clicking "OK".
- After removal, restart the computer and install the controller driver for the new motherboard using the standard method.

- Next in "Dispatcher" click on the section name "System devices".
- In the list that appears, find the element "PCI bus" and double click on it.
- In the PCI bus properties shell, navigate to the section "Driver".
- Click on an element "Delete".
- As when uninstalling the previous driver, click on the button in the dialog box "OK".
- After removing the driver, which may take a long time, turn off the computer and perform the procedure of replacing the motherboard. After turning on the PC for the first time, install the previously prepared motherboard drivers.


You can configure Windows 7 to change the motherboard using a simpler method by editing the registry.
- Type on the keyboard Win+R and type the following command into the window that opens:
Then click on the button "OK".
- In the left area of the displayed interface "Registry Editor" sequentially go to the following folders: "HKEY_LOCAL_MACHINE" And "SYSTEM". Then open "CurrentControlSet" And "services".
- Next, in the last specified folder, find the directory "msahci" and select it.
- Move to the right area of the interface "Editor". Click on the element name "Start".
- In field "Meaning" set the number «0» without quotes and click "OK".
- Further in the section "services" find the folder "pciide" and after selecting it in the right area of the shell, click on the name of the element "Start". In the window that opens, also change the value to «0» and click "OK".
- If you use RAID mode, then in this case you need to perform one more additional step. Move to section "iaStorV" all the same directory "services". Here also go to the element properties "Start" and change the value in the field to «0» , remembering to click after that "OK".
- After completing these steps, turn off the computer and replace the motherboard. After making the replacement, go to the BIOS and activate one of the three ATA modes, or simply leave the value at the default settings. Start Windows and install the controller driver and other motherboard drivers.


Method 2: Setting up the OS after replacing the board
If you have already reinstalled the motherboard and received a “blue screen” error when activating the system, you should not be upset. To perform the necessary manipulations, you need to have an installation flash drive or Windows 7 CD on hand.

- Start your computer from the installation flash drive or CD. In the installer start window, click on the element "System Restore".
- Select an item from the list of funds displayed "Command line".
- In the opened shell "Command line" enter the command:
- The interface familiar to us will be displayed "Registry Editor". Mark the folder "HKEY_LOCAL_MACHINE".
- Then click on the menu "File" and select an option "Load bush".
- In the address bar of the window that opens "Conductor" enter the following path:
C:\Windows\system32\config
Then click ENTER or click on the arrow icon to the right of the address.
- In the directory that appears, find a file without an extension under the name "SYSTEM", mark it and click "Open".
- Next, a window will open in which you need to arbitrarily specify any name for the new section. For example, you can name "new". Then click on the button "OK".
- Now click on the folder name "HKEY_LOCAL_MACHINE" and go to the recently downloaded section.
- Then go through the directories one by one "ControlSet001" And "services".
- Find the section "msahci" and after selecting it, change the value of the parameter "Start" on «0» the same way as was done when considering Method 1.
- Then go to the folder in exactly the same way "pciide" section "services" and change the parameter value "Start" on «0» .
- If you use RAID mode, you will need to complete one more step, otherwise just skip it. Go to the catalog "iaStorV" section "services" and change the parameter value in it "Start" from the current version to «0» . As always, don’t forget to click the button after making changes "OK" in the parameter properties window.
- Then go back to the root of the folder "HKEY_LOCAL_MACHINE" and select the generated section in which the editing was done. In our example it is called "new", but you can have it by any other name.
- Next, click on the menu item called "File" and select the option there "Unload bush".
- A dialog box will open where you need to click on the button to confirm the unloading of the current section and all its subsections "Yes".
- Next close the window "Registry Editor", shell "Command line" and restart your PC. After the standard computer startup, install the hard drive controller drivers for the new motherboard. The system should now activate without a hitch.


To avoid having to reinstall Windows 7 after replacing the motherboard, you need to make the appropriate OS settings. Moreover, this is done both before replacing the motherboard and after this procedure. In the second case, manipulations are performed in the system registry. And in the first situation, in addition to this option, you can also use the mechanism of preliminary reinstallation of hard disk controller drivers.
This guide is intended for users who would like to replace the motherboard on their computers without reinstalling the system. In particular, this article may be useful to you if:
- you are going to upgrade your motherboard, but want to keep your current Windows installation along with settings and programs without reinstalling them from the very beginning;
- You want to switch the SATA controller mode from IDE to AHCI or RAID (or vice versa) to achieve better disk subsystem performance.
If one of the above scenarios applies to you, then you should know that regardless of your goal - replacing the motherboard or switching the SATA controller to a different mode - the result will be the same: Blue Screen of Death (BSOD) error STOP 0x0000007B INACCESSABLE_BOOT_DEVICE when loading the operating system.
The cause of this unfortunate incident is Windows' inability to find the proper drivers for the SATA controller. Fortunately, there is a workaround to the problem, thereby avoiding having to reinstall Windows. To do this, you just need to “tell” the operating system to use the standard SATA controller driver at startup, and .
To make the appropriate changes in the Windows registry, simply follow the instructions below.
Before we begin, please review the information in the two points below, as one of them will determine your plan of action:
1. The motherboard has not yet been replaced, so Windows boots normally. In this case, you need to make changes to the registry in a normal Windows operating environment and only then proceed to update the motherboard.
2. The operating system does not boot because you have already installed a different motherboard, or because you changed the SATA mode in the BIOS. In this case, you will have to use the offline registry editor.
Changing the registry before upgrading the motherboard (Windows boots normally)
These instructions are only for those who have Windows running normally because the motherboard has not yet been replaced. If you already have another board and Windows does not boot, then follow the instructions in the next section of the article.
So, turn on your computer normally and then open the Windows Registry Editor. To do this, press +R, type regedit, press Enter.

Inside the registry, follow this path (in the left pane of the window):
HKEY_LOCAL_MACHINE\SYSTEM\CurrentControlSet\services\msahci

In the right pane of the window, double-click on the parameter Start and change its value to 0 (zero). Then click OK.
Now do the same in the following registry key:
HKEY_LOCAL_MACHINE\SYSTEM\CurrentControlSet\services\pciide

If you are using RAID (otherwise skip this step), then you need to do the same modification in this section:
HKEY_LOCAL_MACHINE\SYSTEM\CurrentControlSet\services\iaStorV
That's all. Your machine is now ready for the update. Turn off your computer, install the new motherboard and connect all the necessary components to it. Then start the system, enter the BIOS and set the ATA mode (IDE-ATA, AHCI or RAID) or leave the default value. Windows should start without problems. When the operating system finishes installing the controller driver, continue installing drivers for the remaining devices on the new motherboard.
Windows won't boot: Changing the registry using the offline editor
Use this instruction if the operating system will not boot because you have already replaced the motherboard, or changed the SATA controller mode in the BIOS.
In this case, you need to use the offline registry editor. To solve this problem, I prefer to use a recovery environment, which can be accessed, for example, using an operating system installation disk.
To open the Registry Editor using the installation DVD or USB drive, follow these steps:
Boot your computer using the installation disc. You may need to select DVD/CD or USB as the first boot device in BIOS settings. For this:
- turn on the computer and press the DEL or F1 or F2 or F10 key to enter the BIOS (the BIOS entry key depends on the computer manufacturer);
- inside the BIOS menu, find the Boot Order option (this option is usually located inside the Advanced BIOS Features menu);
- In Boot Order, select CD/DVDRW or USB (depending on what type of media the Windows installation files are on) as the first boot device. Save your changes and restart your computer by pressing F10.
After rebooting, the computer will begin booting from the installation disk.
After loading, on the very first screen, click “Next” and then select “System Restore”.

If you have Windows 7, in the recovery options window, click Next, and on the next screen, launch Command Prompt.

If you are using Windows 8.x or Windows 10, then you need to go to Diagnostics -> Advanced Options -> Command Prompt.

At the command prompt, enter regedit and press Enter.

In the registry editor, select the branch HKEY_LOCAL_MACHINE, and from the File menu, click Load Hive.

Open the drive on which the operating system is installed.
Go to the Windows\system32\config directory, select the file system and click "Open".

Enter a name for the section (for example, Offline) and click OK.

By expanding the HKEY_LOCAL_MACHINE branch, you will see the created section (in our example it is called Offline).

Expand the new section and go to the following subsection:
HKEY_LOCAL_MACHINE\Offline\ControlSet001\services\msahci
Open the parameter Start, change its value to 0 (zero), click OK.

Perform the same operation in a subkey:
HKEY_LOCAL_MACHINE\Offline\ControlSet001\services\pciide

If you are using RAID (otherwise skip this step), do the same here:
HKEY_LOCAL_MACHINE\Offline\ControlSet001\services\iaStorV
Close Registry Editor, Command Prompt, and restart your computer. Remove the installation disc so that the operating system can boot normally. Windows should now start without any problems and then install the necessary hard drive controller drivers.
That's all!
Have a great day!


